homeassistant添加小米家族的产品已经有很多现成的插件了,有的已经比较完善了,如小米网关、yeelight等,但是对与净化器和插座的插件虽然有但是还存在一些问题,比如无法显示传感器状态、无法加载第二个设备等。本次给大家带来的就是如何解决这些问题。
所使用的方法是通过JS文件配合miio插件来完成的,示范系统为树莓派的debian系统,其他系统可以参照。
1. miio及其插件安装
首先是需要安装miio,代码如下:
sudo npm install –save miio
sudo npm install -g miio
安装完毕后则需要创建js文件了,首先需要创建airpurifier.js文件,内容如下:
#!/usr/bin/node
/* eslint-disable */// Set path to node modules miio
const miio = require(‘miio’);// No need to change any lines in this section
var deviceip = process.argv[2];
var secondarg = process.argv[3];
var thirdarg = process.argv[4];
function exit() {
process.exit(-1);
}// Power On (on / off specified as true or false)
if ( secondarg === “power” ) {
setTimeout(exit, 7000);
console.log(‘Sending Power’, thirdarg, ‘command’);
miio.device({
address: deviceip
}).then(device => {
return device.setPower(JSON.parse(thirdarg));
})}// Status
if ( secondarg === “status-power” ) {
miio.device({
address: deviceip
}).then(device => {
stats = device.getProperties([ ‘power’, ‘mode’, ‘aqi’, ‘temperature’, ‘humidity’,’ledBrightness’ ])
console.log(stats.power);
process.exit();
})}
if ( secondarg === “status-mode” ) {
miio.device({
address: deviceip
}).then(device => {
stats = device.getProperties([ ‘power’, ‘mode’, ‘aqi’, ‘temperature’, ‘humidity’,’ledBrightness’ ])
console.log(stats.mode);
process.exit();
})}
if ( secondarg === “status-aqi” ) {
miio.device({
address: deviceip
}).then(device => {
stats = device.getProperties([ ‘power’, ‘mode’, ‘aqi’, ‘temperature’, ‘humidity’,’ledBrightness’ ])
console.log(stats.aqi);
process.exit();
})}
if ( secondarg === “status-temp” ) {
miio.device({
address: deviceip
}).then(device => {
stats = device.getProperties([ ‘power’, ‘mode’, ‘aqi’, ‘temperature’, ‘humidity’,’ledBrightness’ ])
console.log(stats.temperature);
process.exit();
})}
if ( secondarg === “status-hum” ) {
miio.device({
address: deviceip
}).then(device => {
stats = device.getProperties([ ‘power’, ‘mode’, ‘aqi’, ‘temperature’, ‘humidity’,’ledBrightness’ ])
console.log(stats.humidity);
process.exit();
})}
if ( secondarg === “status-led” ) {
miio.device({
address: deviceip
}).then(device => {
stats = device.getProperties([ ‘power’, ‘mode’, ‘aqi’, ‘temperature’, ‘humidity’,’ledBrightness’ ])
console.log(stats.ledBrightness);
process.exit();
})}// Specify favorite manual fan speed (1 to 16) eg usage: fanspeed 16
if ( secondarg === “fanspeed” ) {
setTimeout(exit, 7000);
console.log(‘Setting manual fan speed to:’, thirdarg);
miio.device({
address: deviceip
}).then(device => {
return device.setFavoriteLevel(parseInt(thirdarg));
})}// Set fan mode option, specify: idle, auto, silent or favorite which needs to be set for manual speed control
if ( secondarg === “fanmode” ) {
setTimeout(exit, 7000);
console.log(‘Telling device to use’, thirdarg, ‘fan speed mode’);
miio.device({
address: deviceip
}).then(device => {
return device.call(‘set_mode’, [ thirdarg ])
})}// Control the device led (specify as bright, dim or off)
if ( secondarg === “led” ) {
setTimeout(exit, 7000);
console.log(‘Setting device led to:’, thirdarg);
miio.device({
address: deviceip
}).then(device => {
return device.setLedBrightness(thirdarg);
})}// Switch the device buzzer on or off (specify as true or false)
if ( secondarg === “buzzer” ) {
setTimeout(exit, 7000);
console.log(‘Setting device buzzer to:’, thirdarg);
miio.device({
address: deviceip
}).then(device => {
return device.setBuzzer(JSON.parse(thirdarg));
})}
在创建一个powerstrip.js文件,内容如下:
#!/usr/bin/node
/* eslint-disable */// Set path to node modules miio
const miio = require(‘miio’);// No need to change any lines in this section
var deviceip = process.argv[2];
var secondarg = process.argv[3];
var thirdarg = process.argv[4];
function exit() {
process.exit(-1);
}// Power On (on / off specified as true or false)
if ( secondarg === “power” ) {
setTimeout(exit, 7000);
console.log(‘Sending Power’, thirdarg, ‘command’);
miio.device({
address: deviceip
}).then(device => {
return device.setPower(JSON.parse(thirdarg));
})}// Status
if ( secondarg === “status” ) {
miio.device({
address: deviceip
}).then(device => {
stats = device.getProperties([‘power’])
console.log(stats.power);
process.exit();
})}// Specify favorite manual fan speed (1 to 16) eg usage: fanspeed 16
if ( secondarg === “fanspeed” ) {
setTimeout(exit, 7000);
console.log(‘Setting manual fan speed to:’, thirdarg);
miio.device({
address: deviceip
}).then(device => {
return device.setFavoriteLevel(parseInt(thirdarg));
})}// Set fan mode option, specify: idle, auto, silent or favorite which needs to be set for manual speed control
if ( secondarg === “fanmode” ) {
setTimeout(exit, 7000);
console.log(‘Telling device to use’, thirdarg, ‘fan speed mode’);
miio.device({
address: deviceip
}).then(device => {
return device.call(‘set_mode’, [ thirdarg ])
})}// Control the device led (specify as bright, dim or off)
if ( secondarg === “led” ) {
setTimeout(exit, 7000);
console.log(‘Setting device led to:’, thirdarg);
miio.device({
address: deviceip
}).then(device => {
return device.setLedBrightness(thirdarg);
})}// Switch the device buzzer on or off (specify as true or false)
if ( secondarg === “buzzer” ) {
setTimeout(exit, 7000);
console.log(‘Setting device buzzer to:’, thirdarg);
miio.device({
address: deviceip
}).then(device => {
return device.setBuzzer(JSON.parse(thirdarg));
})}
2. homeassistant的配置
(1)净化器配置
由于本次使用的是cmd平台,有一定的延迟,所以小米净化器开关还是用py的插件来控制,小米净化器开关配置大家自行搜索,其余功能使用command-line平台实现,这里要介绍的是如何使用cmd平台设置运行模式、LED灯以及实时显示传感器数据。
首先需要查出你的净化器IP地址,这里有很多方法,直接进路由、fing 等,查到IP后,需要设置shell_commands来建立shell_commands服务。
在homeassistant配置目录中建立shell_commands.yaml文件,里面配置如下(192.168.1.197为净化器ip地址,以下一样):
a_auto: ‘node /home/pi/airpurifier.js 192.168.1.197 fanmode auto’
a_silent: ‘node /home/pi/airpurifier.js 192.168.1.197 fanmode silent’
a_favorite: ‘node /home/pi/airpurifier.js 192.168.1.197 fanmode favorite’
a_bright: ‘node /home/pi/airpurifier.js 192.168.1.197 led bright’
a_dim: ‘node /home/pi/airpurifier.js 192.168.1.197 led dim’
a_ledoff: ‘node /home/pi/airpurifier.js 192.168.1.197 led off’
configuration文件文件中加入如下代码:
shell_command: !include shell_commands.yaml
过后需要在传感器配置(sensors)文件或者configuration文件中配置传感器,配置可以参照我的格式,大家注意速进,不然运行会提示错误,(备注:name可以直接中文,这样就不需要后续汉化)
– platform: command_line
name: ‘airpurifier-mode’
command: node /home/pi/airpurifier.js 192.168.1.197 status-mode– platform: command_line
name: ‘airpurifier-aqi’
command: node /home/pi/airpurifier.js 192.168.1.197 status-aqi
unit_of_measurement: “AQI”– platform: command_line
name: ‘airpurifier-temp’
command: node /home/pi/airpurifier.js 192.168.1.197 status-temp
unit_of_measurement: “°C”– platform: command_line
name: ‘airpurifier-hum’
command: node /home/pi/airpurifier.js 192.168.1.197 status-hum
unit_of_measurement: “%”– platform: command_line
name: ‘airpurifier-led’
command: node /home/pi/airpurifier.js 192.168.1.197 status-led
过后需要建立input_select的选择开关和binary_sensor传感器,你可以直接在configuration文件中配置,也可以将其在子文件中编辑。
我采用的是在子文件编辑,需要在homeassistant配置目录中建立input_select.yaml文件,里面配置如下:
airpurifier_mode:
name: ‘净化器模式’
options:
– ‘自动模式’
– ‘安静模式’
– ‘最爱模式’
– ‘关’
initial: ‘自动模式’
icon: mdi:fanairpurifier_led:
name: ‘净化器LED’
options:
– ‘高亮’
– ‘微亮’
– ‘关闭’
initial: ‘高亮’
icon: mdi:led-on
在homeassistant配置目录中建立binary_sensor.yaml文件,里面配置如下:
– platform: command_line
command: node /home/pi/airpurifier.js 192.168.1.197 status-power
name: ‘airpurifier-power’
device_class: connectivity
payload_on: “true”
payload_off: “false”
过后在configuration文件中插入如下代码:
input_select: !include input_select.yaml
binary_sensor: !include binary_sensor.yaml
过后就是自动化配置了,在automations配置文件中,输入如下代码:
#########################################
############ 小米净化器配置 #############
#########################################
– id: ‘1495687391563’
alias: airpurifier-mode1
initial_state: true
hide_entity: true
trigger:
platform: state
entity_id: input_select.airpurifier_mode
action:
service_template: >
{% if is_state(“input_select.airpurifier_mode”, “关”) %}
switch.turn_off
{% elif is_state(“input_select.airpurifier_mode”, “自动模式”) %}
shell_command.a_auto
{% elif is_state(“input_select.airpurifier_mode”, “安静模式”) %}
shell_command.a_silent
{% elif is_state(“input_select.airpurifier_mode”, “最爱模式”) %}
shell_command.a_favorite
{% endif %}
entity_id: switch.air_purifier– id: ‘1495687391564’
alias: airpurifier-mode2
initial_state: true
hide_entity: true
trigger:
platform: state
entity_id: sensor.airpurifiermode
action:
service: input_select.select_option
entity_id: input_select.airpurifier_mode
data_template:
option: >
{% if is_state(“switch.air_purifier”, “off”) %}
关
{% elif is_state(“sensor.airpurifiermode”, “auto”) %}
自动模式
{% elif is_state(“sensor.airpurifiermode”, “silent”) %}
安静模式
{% elif is_state(“sensor.airpurifiermode”, “favorite”) %}
最爱模式
{% endif %}– id: ‘1495687391565’
alias: airpurifier-led1
initial_state: true
hide_entity: true
trigger:
platform: state
entity_id: input_select.airpurifier_led
action:
service_template: >
{% if is_state(“input_select.airpurifier_led”, “高亮”) %}
shell_command.a_bright
{% elif is_state(“input_select.airpurifier_led”, “微亮”) %}
shell_command.a_dim
{% elif is_state(“input_select.airpurifier_led”, “关闭”) %}
shell_command.a_ledoff
{% endif %}
entity_id: switch.air_purifier– id: ‘1495687391566’
alias: airpurifier-led2
initial_state: true
hide_entity: true
trigger:
platform: state
entity_id: sensor.airpurifierled
action:
service: input_select.select_option
entity_id: input_select.airpurifier_led
data_template:
option: >
{% if is_state(“sensor.airpurifierled”, “bright”) %}
高亮
{% elif is_state(“sensor.airpurifierled”, “dim”) %}
微亮
{% elif is_state(“sensor.airpurifierled”, “off”) %}
关闭
{% endif %}
过后是分组,分组在groups配置文件中输入如下代码
airpurifier:
name: 小米净化器
view: no
entities:
– sensor.airpurifieraqi
– sensor.airpurifiertemp
– sensor.airpurifierhum####这是py净化器开关####
– switch.air_purifier###根据自己的配置修改###
– input_select.airpurifier_mode
– input_select.airpurifier_led
最后是汉化,在customize配置文件中设置,代码如下:
sensor.airpurifieraqi:
friendly_name: 小米净化器AQI
homebridge_name: 小米净化器AQI
icon: mdi:apple-mobileme
sensor.airpurifiertemp:
friendly_name: 小米净化器温度
homebridge_name: 小米净化器温度
sensor.airpurifierhum:
friendly_name: 小米净化器湿度
homebridge_name: 小米净化器湿度
icon: mdi:thermometer-lines
input_select.airpurifier_mode:
friendly_name: 小米净化器模式
homebridge_name: 小米净化器模式
input_select.airpurifier_led:
friendly_name: 小米净化器指示灯
homebridge_name: 小米净化器指示灯
binary_sensor.airpurifierpower:
friendly_name: 小米净化器状态
homebridge_name: 小米净化器状态
hidden: true
sensor.airpurifiermode:
friendly_name: 小米净化器模式状态
homebridge_name: 小米净化器模式状态
hidden: true
sensor.airpurifierled:
friendly_name: 小米净化器指示状态
homebridge_name: 小米净化器指示状态
hidden: true
(2)小米插座开关配置
类似与净化器,在刚才创建的shell_commands.yaml文件中加入如下代码:
h_on: ‘node /home/pi/powerstrip.js 192.168.1.111 power true’
h_off: ‘node /home/pi/powerstrip.js 192.168.1.111 power false’
input_boolean.yaml文件里面配置如下:
powerstrip:
name: ‘插座开关’
icon: mdi:lightbulb-on
initial: off
binary_sensor.yaml文件里面配置如下:
– platform: command_line
command: node /home/pi/powerstrip.js 192.168.1.111 status
name: ‘powerstrip’
device_class: connectivity
payload_on: “{ ‘0’: true }”
payload_off: “{ ‘0’: false }”
configuration文件文件中加入如下代码:
input_boolean: !include input_boolean.yaml
automations配置文件中,输入如下代码:
#########################################
############# 小米插座配置 ##############
#########################################
– id: ‘1495687391558’
alias: powerstrip_on
initial_state: true
hide_entity: true
trigger:
– platform: state
entity_id: input_boolean.powerstrip
from: ‘off’
to: ‘on’
action:
– service: shell_command.h_on– id: ‘1495687391559’
alias: powerstrip_off
initial_state: true
hide_entity: true
trigger:
– platform: state
entity_id: input_boolean.powerstrip
from: ‘on’
to: ‘off’
action:
– service: shell_command.h_off– id: ‘1495687391560’
alias: powerstrip_status_on
initial_state: true
hide_entity: true
trigger:
– platform: state
entity_id: binary_sensor.powerstrip
from: ‘off’
to: ‘on’
condition:
– condition: state
entity_id: input_boolean.powerstrip
state: ‘off’
action:
– service: input_boolean.turn_on
entity_id: input_boolean.powerstrip– id: ‘1495687391561’
alias: powerstrip_status_off
initial_state: true
hide_entity: true
trigger:
– platform: state
entity_id: binary_sensor.powerstrip
from: ‘on’
to: ‘off’
condition:
– condition: state
entity_id: input_boolean.powerstrip
state: ‘on’
action:
– service: input_boolean.turn_off
entity_id: input_boolean.powerstrip– id: ‘1495687391562’
alias: powerstrip_status
initial_state: true
hide_entity: true
trigger:
– platform: homeassistant
event: start
condition:
– condition: template
value_template: “{% if states.input_boolean.powerstrip.state != states.binary_sensor.powerstrip.state %}true{% endif %}”
action:
– service: input_boolean.turn_on
entity_id: input_boolean.powerstrip
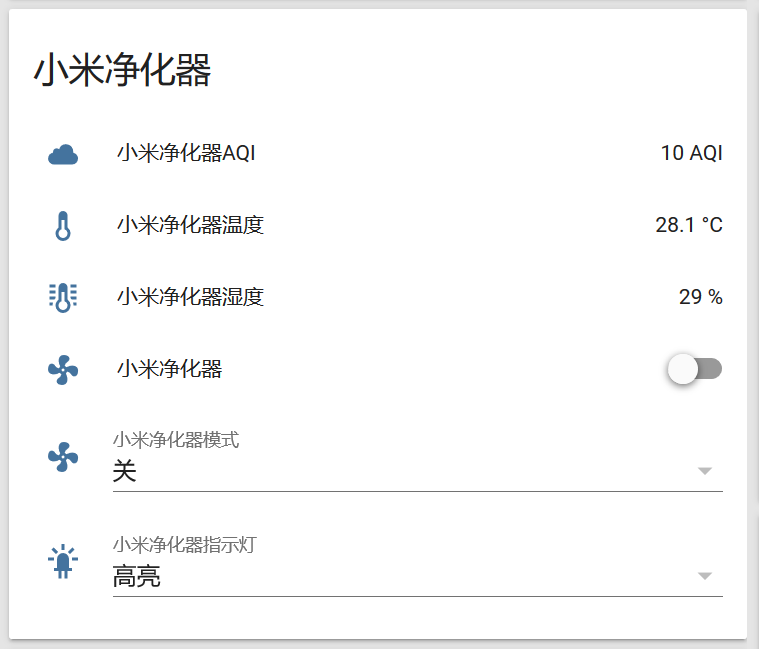
至此,所以配置完毕,效果大致如下

| 移动设备快速阅读本文: |  |
| 请扫描右侧二维码 |
