最近几年,雾霾收到大众的关注,特别是在北京这样的城市,雾霾天也习以为常了,气象部分也公布一些检测数据,但是对于数据的准确度,本人是持怀疑态度的,所以才有了下面的折腾。
目前空气监测设备某宝上面已经有很多了,但是准确度不敢保证,因为使用的传感器质量有好坏,另一方面,为了后续能够与家中的净化系统联动,而目前市面上的监测设备多数无法联网,所以就萌生自己DIY一个空气监测装置。监测及查看方式如下所示:
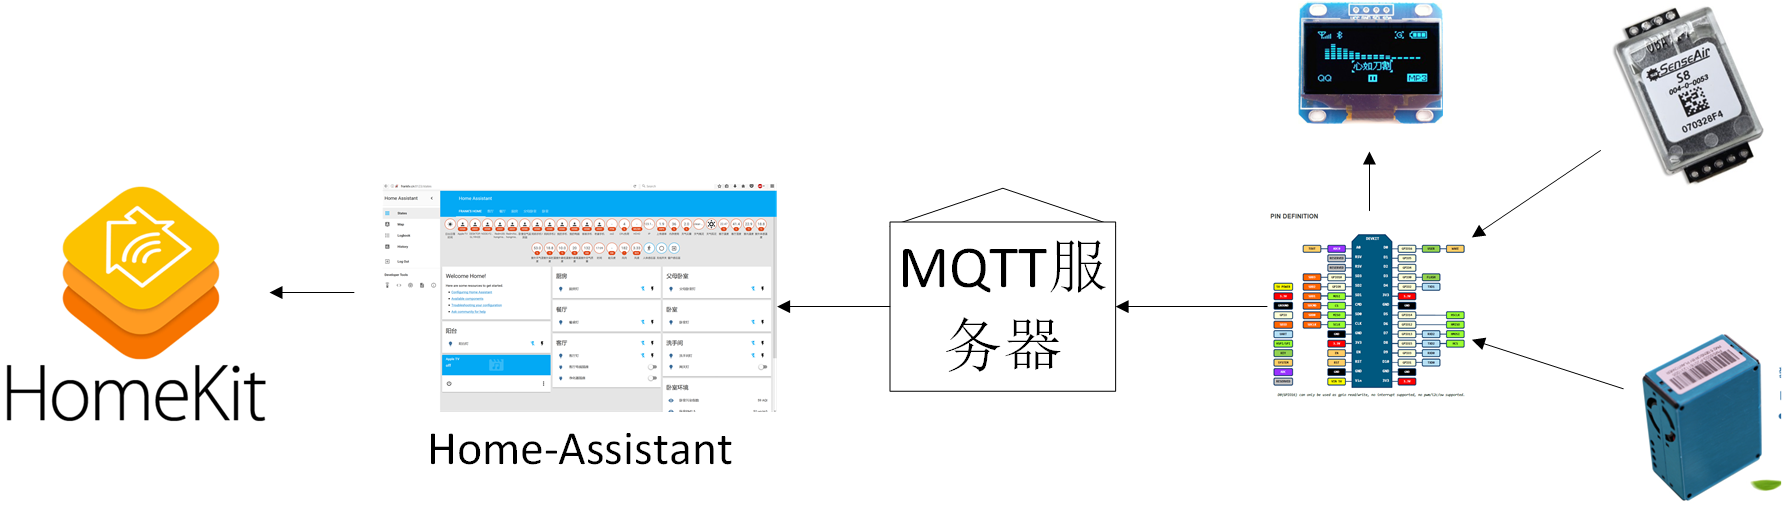
所使用到的设备有:esp8266开发板(带WIFI功能)、PMS5003ST G5T(攀藤)、senseAir红外CO2二氧化碳传感器 S8 0053、DS-HCHO甲醛传感器(攀藤)以及液晶显示屏(1.3寸 I2C OLED)。
由于家中监测甲醛只是偶尔会用到,所以我就将甲醛传感器单独做成一个监测设备,颗粒物+温湿度+CO2做成一个监测设备,这样颗粒物的那个设备可以长期在线,甲醛的那个设备随用随开。
先来介绍下各个设备的作用吧。esp8266开发板是承担读取各个传感器的数据以及远传数据到我的服务器,开发语言可以使用lua或者arduino,本人使用的是lua语言;PMS5003ST G5T是颗粒物及温湿度传感器,可以监测空气中的PM1、PM10、PM2.5以及温度和湿度,其读取方式为主动读取(即直接读数);S8二氧化碳传感器可以监测空气中的二氧化碳,其读数为被动读取(需要写入数据指令过后再能读取数据);DS-HCHO甲醛传感器可以监测空气中的甲醛浓度,其读数也是被动读取的;液晶显示屏可以实时本地显示各个设备的监测值。
开发使用的软件:notepad++、ESP8266Flasher、ESPlorer,以及modemcu固件
notepad++负责代码的编写,下载地址:https://notepad-plus-plus.org/
ESP8266Flasher负责将官方固件刷入esp8266,下载地址:https://github.com/nodemcu/nodemcu-flasher
ESPlorer负责将编写的代码上传到esp8266,下载地址:http://esp8266.ru/esplorer/#download
固件采用nodemcu的官方固件,此固件需要进行定制,只需输入邮箱和需要的扩展模块即可(扩展模块不能全部选择,不然无法完成制作),地址:https://nodemcu-build.com/。
我使用到的模块:cjson, crypto, dht, enduser_setup, file, gpio, http, i2c, mdns, mqtt, net, node, ow, pwm, rc, sntp, spi, struct, tmr, u8g, uart, websocket, wifi, tls。模块的选择可以根据自己所需的函数来确定。
1.自动运行脚本编写
以上准备完毕后就开始程序的编写了,代码1是PMS5003ST G5T(攀藤)和senseAir红外CO2二氧化碳传感器 S8 0053组合的脚本,您编写的时候可以根据自己的需求进行修改
function initOLED(sda, scl) –Set up the u8glib lib
sla = 0x3c
i2c.setup(0, sda, scl, i2c.SLOW)
disp = u8g.sh1106_128x64_i2c(sla)
disp:setFont(u8g.font_6x10)
disp:setFontRefHeightExtendedText()
disp:setDefaultForegroundColor()
disp:setFontPosTop()
end –初始化OLEDfunction initSCREEN()
SDA = 5 –D5
SCL = 6 –D6
initOLED(SDA, SCL) –需要换成自己的串口
disp:firstPage()
repeat
disp:drawFrame(15,15,100,25)
disp:drawStr(25,25,”PM2.5 Detector”)
disp:drawStr(30,50,”Frank’s Home”)
until disp:nextPage() == false
end –初始化屏幕function dispOLED(d1, d2, d3, d4, d5) –dispOLED(pm25, co2, aqi1, temp, hum)
disp:firstPage()
repeat
disp:drawFrame(25,0,80,12)
disp:drawStr(30, 2, “Frank’s Home”)
disp:drawStr(0, 15, “PM2.5”)
disp:drawStr(0, 23, “ug/m3”)
disp:drawStr(98, 15, “CO2”)
disp:drawStr(98, 23, “ppm”)
disp:drawStr(60, 15, “AQI”)
if (d1 == nil) then
disp:drawStr(0, 37, “”)
else
disp:drawStr(0, 37, d1)
end
if (d2 == nil) then
disp:drawStr(98, 37, “”)
else
disp:drawStr(98, 37, d2)
end
if (d3 == nil) then
disp:drawStr(60, 35, “”)
else
disp:drawStr(60, 35, d3)
end
if (d4 == nil) then
disp:drawStr(0, 52, “Temp “..””..”C”)
else
disp:drawStr(0, 52, “Temp “..d4..”C”)
end
if (d5 == nil) then
disp:drawStr(66, 52, “Humi “..””..”%”)
else
disp:drawStr(66, 52, “Humi “..d5..”%”)
end
until disp:nextPage() == false
end –OLED显示function initWIFI()
wifi.setmode(wifi.STATION)
wifi.sta.config(“SSID”, “password”)
wifi.sta.connect()
tmr.alarm(1, 500, 1,
function()
j =j + 1
if wifi.sta.getip()== nil then
disp:firstPage()
repeat
disp:drawFrame(15,5,100,25)
disp:drawStr(25,15,”PM2.5 Detector”)
disp:drawStr(30,35,”Frank’s Home”)
disp:drawStr(33,50,”IP Getting”)
until disp:nextPage() == false
else
j = 0
tmr.stop(1)
disp:firstPage()
repeat
disp:drawFrame(15,5,100,25)
disp:drawStr(25,15,”PM2.5 Detector”)
disp:drawStr(30,35,”Frank’s Home”)
disp:drawStr(20,50,”IP:”..wifi.sta.getip())
until disp:nextPage() == false
end
if wifi.sta.getip()== nil and j >= 20 then
j = 0
tmr.stop(1)
disp:firstPage()
repeat
disp:drawFrame(15,5,100,25)
disp:drawStr(25,15,”PM2.5 Detector”)
disp:drawStr(30,35,”Frank’s Home”)
disp:drawStr(25,50,”IP unavailable”)
until disp:nextPage() == false
end
end) — function
end — initWIFIfunction sendData(t1, t2, t3, t4, t5, t6, t7) –sendData(aqi1,pm25,pm10,pm01,temp,hum,co2)
m = mqtt.Client()
m:connect(“服务器地址”, 端口, 0, 0,
function(conn)
print(“Connected to MQTT”)
if t1 ~= nil then
m:publish(“/aqi1”, t1, 0, 0,
function(client)
end)
end
if t2 ~= nil then
m:publish(“/pm25”, t2, 0, 0,
function(client)
end)
end
if t3 ~= nil then
m:publish(“/pm10”, t3, 0, 0,
function(client)
end)
end
if t4 ~= nil then
m:publish(“/pm01”, t4, 0, 0,
function(client)
end)
end
if t5 ~= nil then
m:publish(“/temp”, t5, 0, 0,
function(client)
end)
end
if t6 ~= nil then
m:publish(“/hum”, t6, 0, 0,
function(client)
end)
end
if t7 ~= nil then
m:publish(“/co2”, t7, 0, 0,
function(client)
end)
end
end,
function(client, reason)
print(“Connection failed, reason: ” .. reason)
end)
end — 连接到MQTT服务器function parse(data)
local bs = {}
for i = 1, #data do
bs[i] = string.byte(data, i)
endif (bs[1] ~= 0x42) or (bs[2] ~= 0x4d) then
return nil
endlocal d = {}
d[‘pm1_0-CF1-ST’] = bs[5] * 256 + bs[6]
d[‘pm2_5-CF1-ST’] = bs[7] * 256 + bs[8]
d[‘pm10-CF1-ST’] = bs[9] * 256 + bs[10]
d[‘pm1_0-AT’] = bs[11] * 256 + bs[12]
d[‘pm2_5-AT’] = bs[13] * 256 + bs[14]
d[‘pm10-AT’] = bs[15] * 256 + bs[16]
d[‘0_3um-count’] = bs[17] * 256 + bs[18]
d[‘0_5um-count’] = bs[19] * 256 + bs[20]
d[‘1_0um-count’] = bs[21] * 256 + bs[22]
d[‘2_5um-count’] = bs[23] * 256 + bs[24]
d[‘temperature’] = bs[25] * 256 + bs[26]
d[‘humidity’] = bs[27] * 256 + bs[28]
return d
end — parsefunction aqipm25(t)
if (t <= 12) then return t * 50 / 12
elseif (t <= 35) then return 50 + (t – 12) * 50 / 23
elseif (t <= 55) then return 100 + (t – 35) * 5 / 2
elseif (t <= 150) then return 150 + (t – 55) * 2
elseif (t <= 350) then return 50 + t
else return 400 + (t – 350) * 2 / 3
end
end –aqipm25function aqipm10(t)
if (t <= 55) then return t * 50 / 55
elseif (t <= 355) then return 50 + (t – 55) / 2
elseif (t <= 425) then return 200 + (t – 355) * 10 / 7
elseif (t <= 505) then return 300 + (t – 425) * 10 / 8
else return t – 105
end
end –aqipm10function aqi(t25,t10)
if (t25 > t10) then return math.ceil(t10)
else return math.ceil(t25)
end
end –aqifunction getaqi()
uart.alt(0)
data = nil
uart.setup(0, 9600, 8, 0, 1, 0)
uart.on(“data”, 32,function(data)
pms5 = parse(data)
if pms5 ~= nil then
pm01 = pms5[‘pm1_0-AT’]
pm25 = pms5[‘pm2_5-AT’]
pm10 = pms5[‘pm10-AT’]
temp = pms5[‘temperature’] / 10
hum = pms5[‘humidity’] / 10
aqi25 = aqipm25(pm25)
aqi10 = aqipm10(pm10)
aqi1 = aqi(aqi25,aqi10)
end
getco2()
end,0)
end –getaqifunction getco2()
uart.alt(1)
data = nil
uart.setup(0, 9600, 8, 0, 1, 0)
tmr.alarm(3, 10000, 1, function()
data = nil
uart.write(0,0xFE,0x04,0x00,0x03,0x00,0x01,0xD5,0xC5)
uart.on(“data”, 7, function(data)
co = data
if (string.len(co) == 7) and ((string.byte(co,1) == 0xFE) or (string.byte(co,2) == 0x04)) then
co2 = string.byte(co,4)*256 + string.byte(co,5)k = k + 1
tmr.stop(3)
dispOLED(pm25, co2, aqi1, temp, hum)
if wifi.sta.getip()~= nil and k >= 2 then
k = 0
sendData(aqi1,pm25,pm10,pm01,temp,hum,co2)
end
getaqi()
end
end,0)
end)
end –getco2j = 0
k = 0
pms5 = nil
aqi1 = nil
pm25 = nil
pm10 = nil
pm01 = nil
temp = nil
hum = nil
co = nil
co2 = nil
disp = nil
initSCREEN()
initWIFI()
getaqi()
代码2是单个甲醛传感器的代码
function initOLED(sda, scl) –Set up the u8glib lib
sla = 0x3c
i2c.setup(0, sda, scl, i2c.SLOW)
disp = u8g.sh1106_128x64_i2c(sla)
disp:setFont(u8g.font_6x10)
disp:setFontRefHeightExtendedText()
disp:setDefaultForegroundColor()
disp:setFontPosTop()
end –初始化OLEDfunction initSCREEN()
SDA = 5 –D5
SCL = 6 –D6
initOLED(SDA, SCL) –需要换成自己的串口
disp:firstPage()
repeat
disp:drawFrame(15,15,100,25)
disp:drawStr(28,25,”HCHO Detector”)
disp:drawStr(30,50,”Frank’s Home”)
until disp:nextPage() == false
end –初始化屏幕function dispOLED(d1) –dispOLED(HCHO)
disp:firstPage()
repeat
disp:drawFrame(15,15,100,20)
disp:drawStr(30,20,”Frank’s Home”)
disp:drawStr(10, 50, “HCHO”)
disp:drawStr(90, 50, “mg/m3”)
if (d1 == nil) then
disp:drawStr(50, 50, “”)
else
disp:drawStr(50, 50, d1)
end
until disp:nextPage() == false
end –OLED显示function initWIFI()
wifi.setmode(wifi.STATION)
wifi.sta.config(“SSID”, “password”)
wifi.sta.connect()
tmr.alarm(1, 500, 1,
function()
j =j + 1
if wifi.sta.getip()== nil then
disp:firstPage()
repeat
disp:drawFrame(15,5,100,25)
disp:drawStr(25,15,”HCHO Detector”)
disp:drawStr(30,35,”Frank’s Home”)
disp:drawStr(33,50,”IP Getting”)
until disp:nextPage() == false
else
j = 0
tmr.stop(1)
disp:firstPage()
repeat
disp:drawFrame(15,5,100,25)
disp:drawStr(25,15,”HCHO Detector”)
disp:drawStr(30,35,”Frank’s Home”)
disp:drawStr(20,50,”IP:”..wifi.sta.getip())
until disp:nextPage() == false
end
if wifi.sta.getip()== nil and j >= 20 then
j = 0
tmr.stop(1)
disp:firstPage()
repeat
disp:drawFrame(15,5,100,25)
disp:drawStr(25,15,”HCHO Detector”)
disp:drawStr(30,35,”Frank’s Home”)
disp:drawStr(25,50,”IP unavailable”)
until disp:nextPage() == false
end
end) — function
end — initWIFIfunction sendData(t1) –sendData(HCHO)
m = mqtt.Client()
m:connect(“服务器地址”, 端口, 0, 0,
function(conn)
print(“Connected to MQTT”)
if t1 ~= nil then
m:publish(“/HCHO”, t1, 0, 0,
function(client)
end)
end
end,
function(client, reason)
print(“Connection failed, reason: ” .. reason)
end)
end — 连接到MQTT服务器function gethcho()
uart.alt(0)
data = nil
uart.setup(0, 9600, 8, 0, 1, 0)
tmr.alarm(2, 5000, 1, function()
data = nil
uart.write(0,0×42,0x4d,0x01,0x00,0x00,0x00,0x90)
uart.on(“data”, 10, function(data)
hh = data
if (string.len(hh) == 10) and (string.byte(hh,1)==0x42) and (string.byte(hh,2)==0x4d)then
HCHO = (string.byte(hh,7)*256+string.byte(hh,8))/100
k = k + 1
dispOLED(HCHO)
if wifi.sta.getip()~= nil and k >= 4 then
k = 0
sendData(HCHO)
end
end
end, 0)
end)
end –gethchoj = 0
k = 0
hh = nil
HCHO = nil
disp = nil
initSCREEN()
initWIFI()
gethcho()
以上代码需要根据自己的配置修改保存为init.lua,使用ESPlorer上传到你的esp8266即可自动运行(此代码是上传数据到MQTT服务器上面,上传到其他平台需要自行修改)。
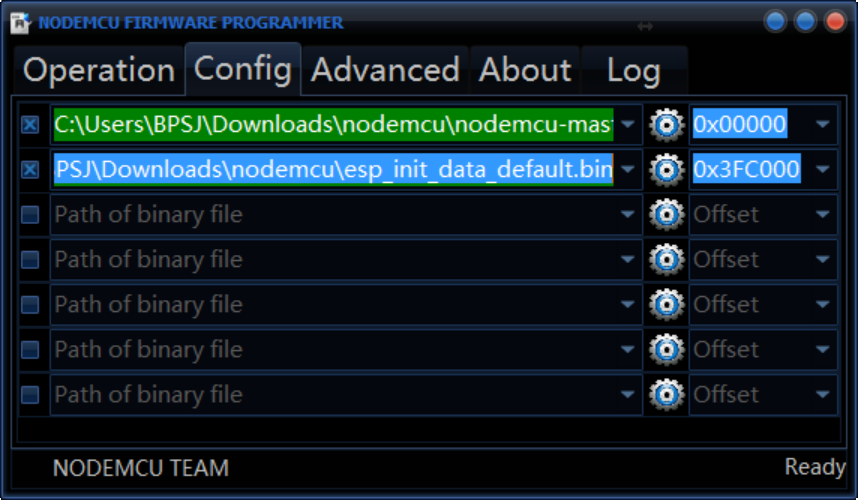
2.固件及脚本的刷入
接下来就是刷写固件到esp8266中,ESP8266Flasher是比较傻瓜的输入方式,当驱动安装完成后直接识别COM口,这个就不需要你管了,刷入固件需要选择如下方式即可(切记第二个齿轮后面是0x3FC000),过后回到Operation界面点击flash即可:
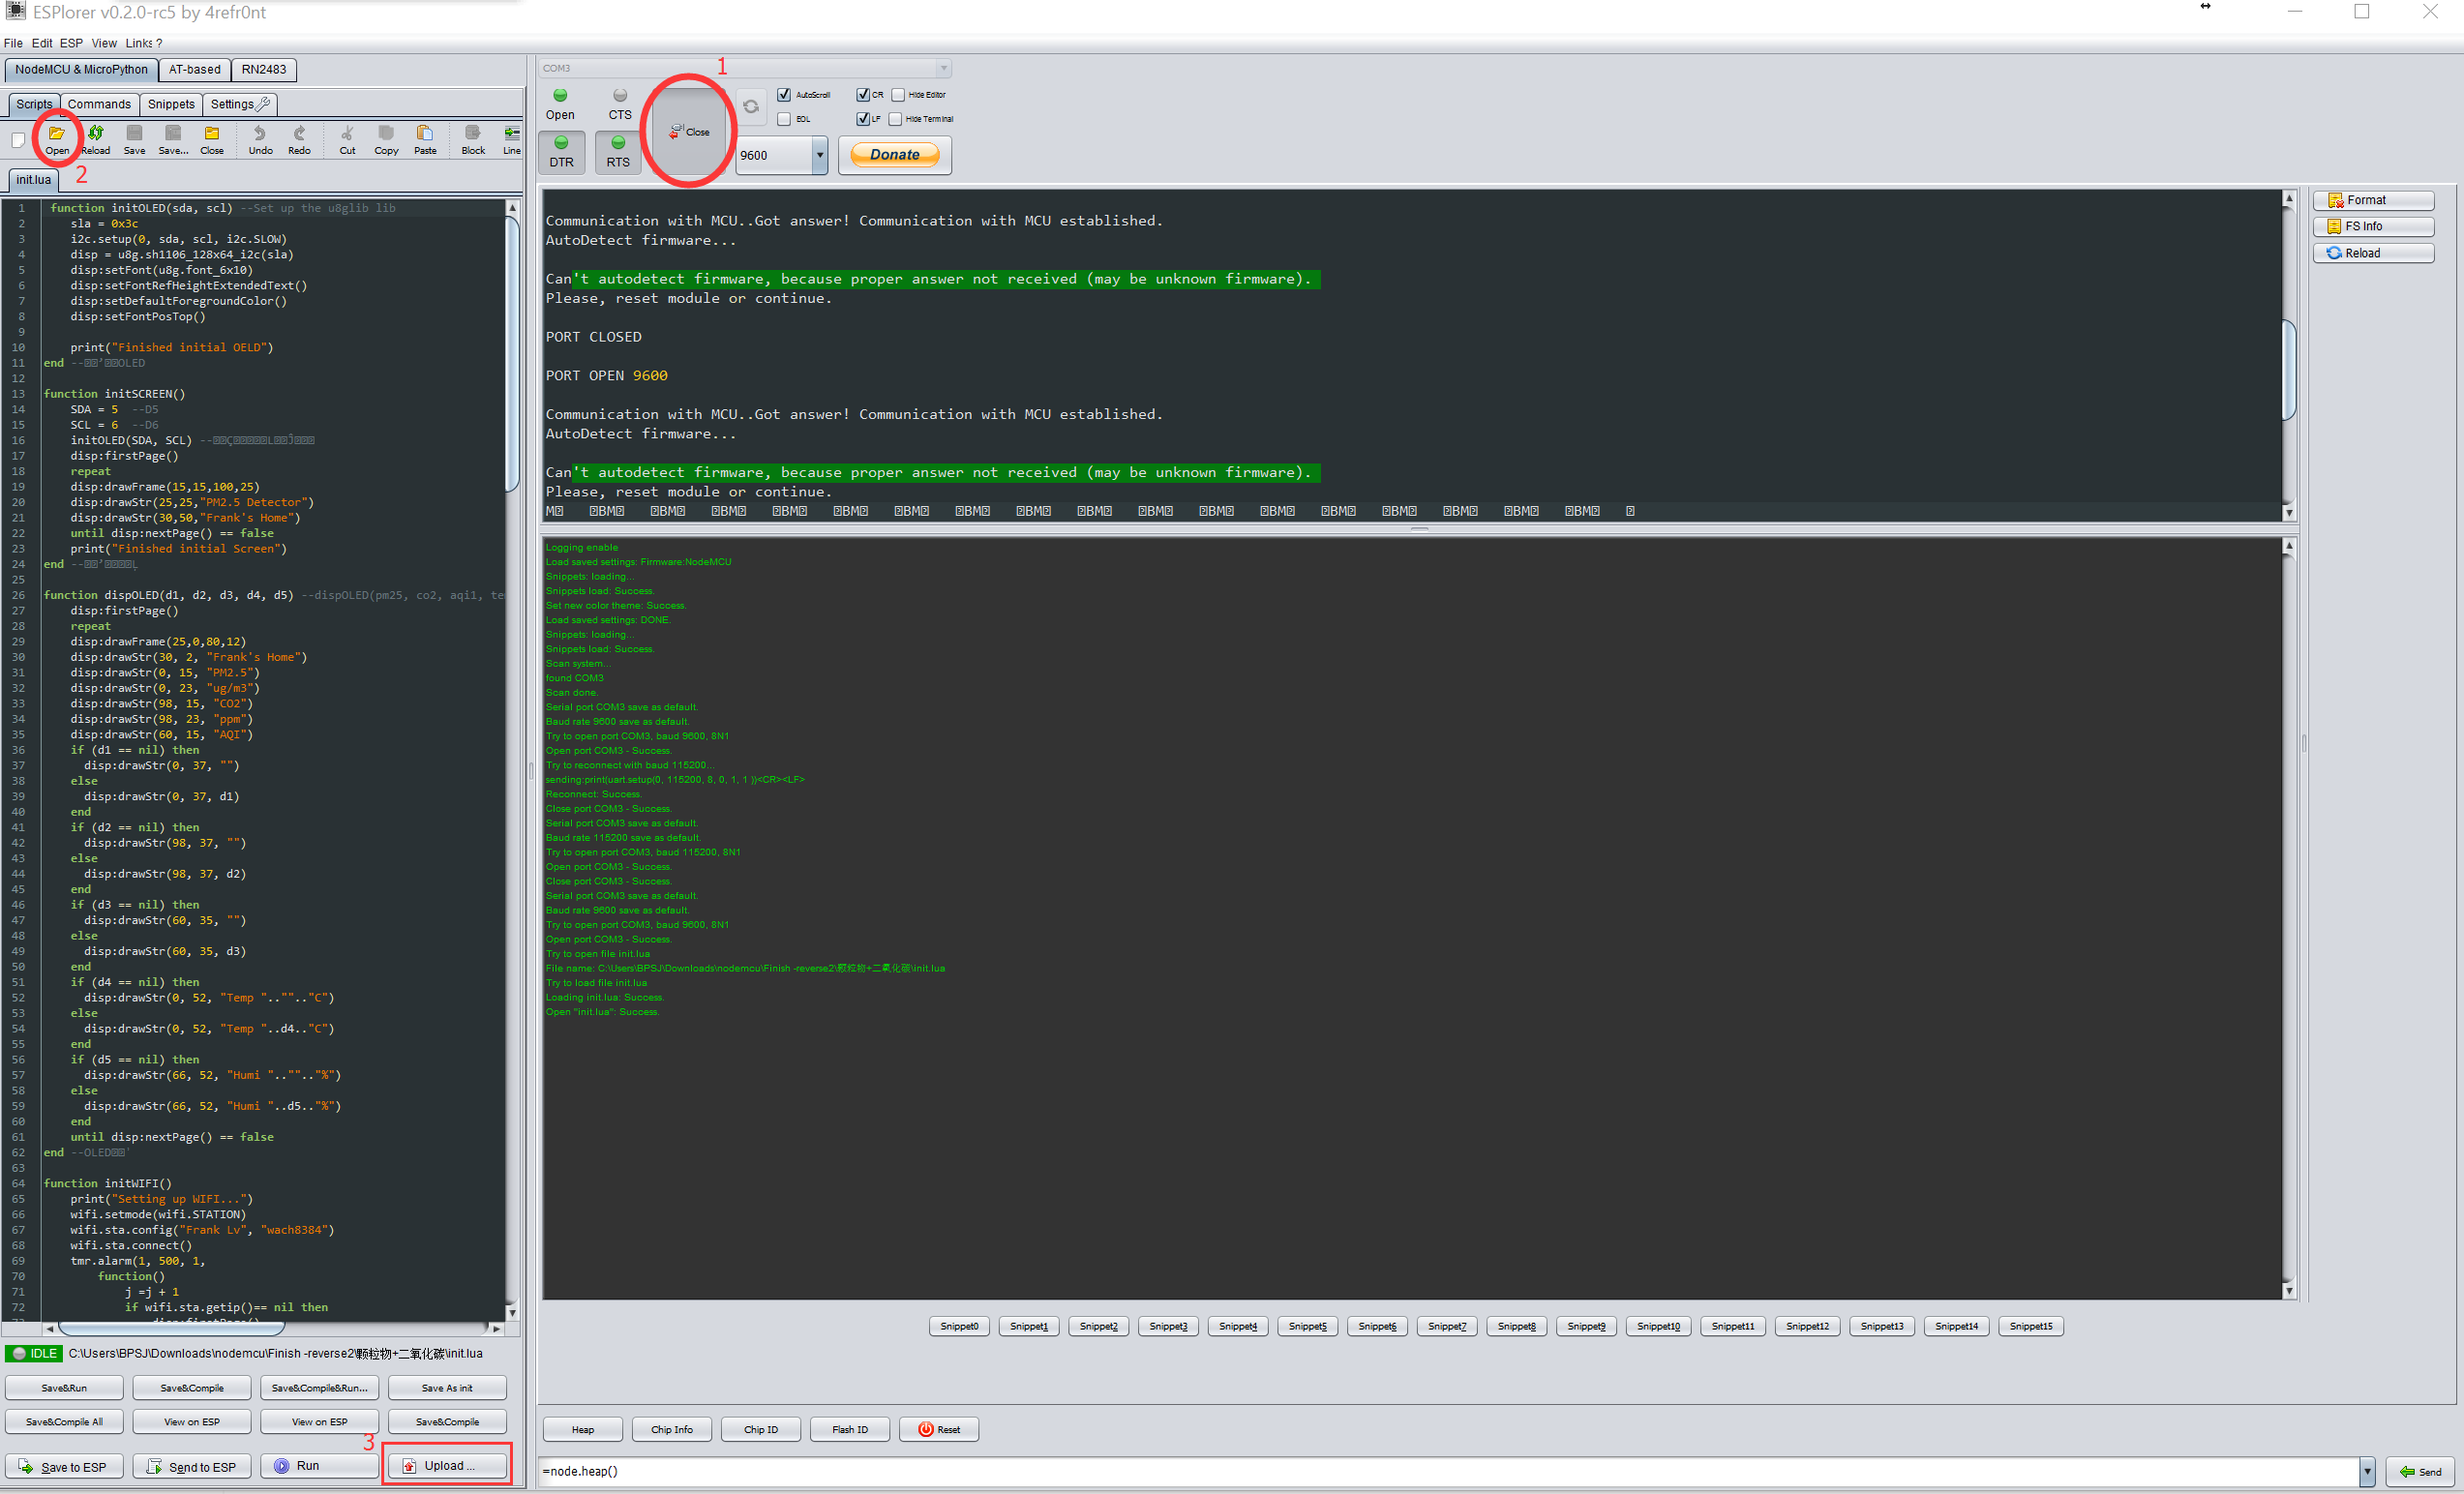
刷入固件完成后就可以刷入自己写的脚本了,将脚本命名为init.lua,通过ESPlorer连接esp8266来上传脚本,具体步骤可见下图:
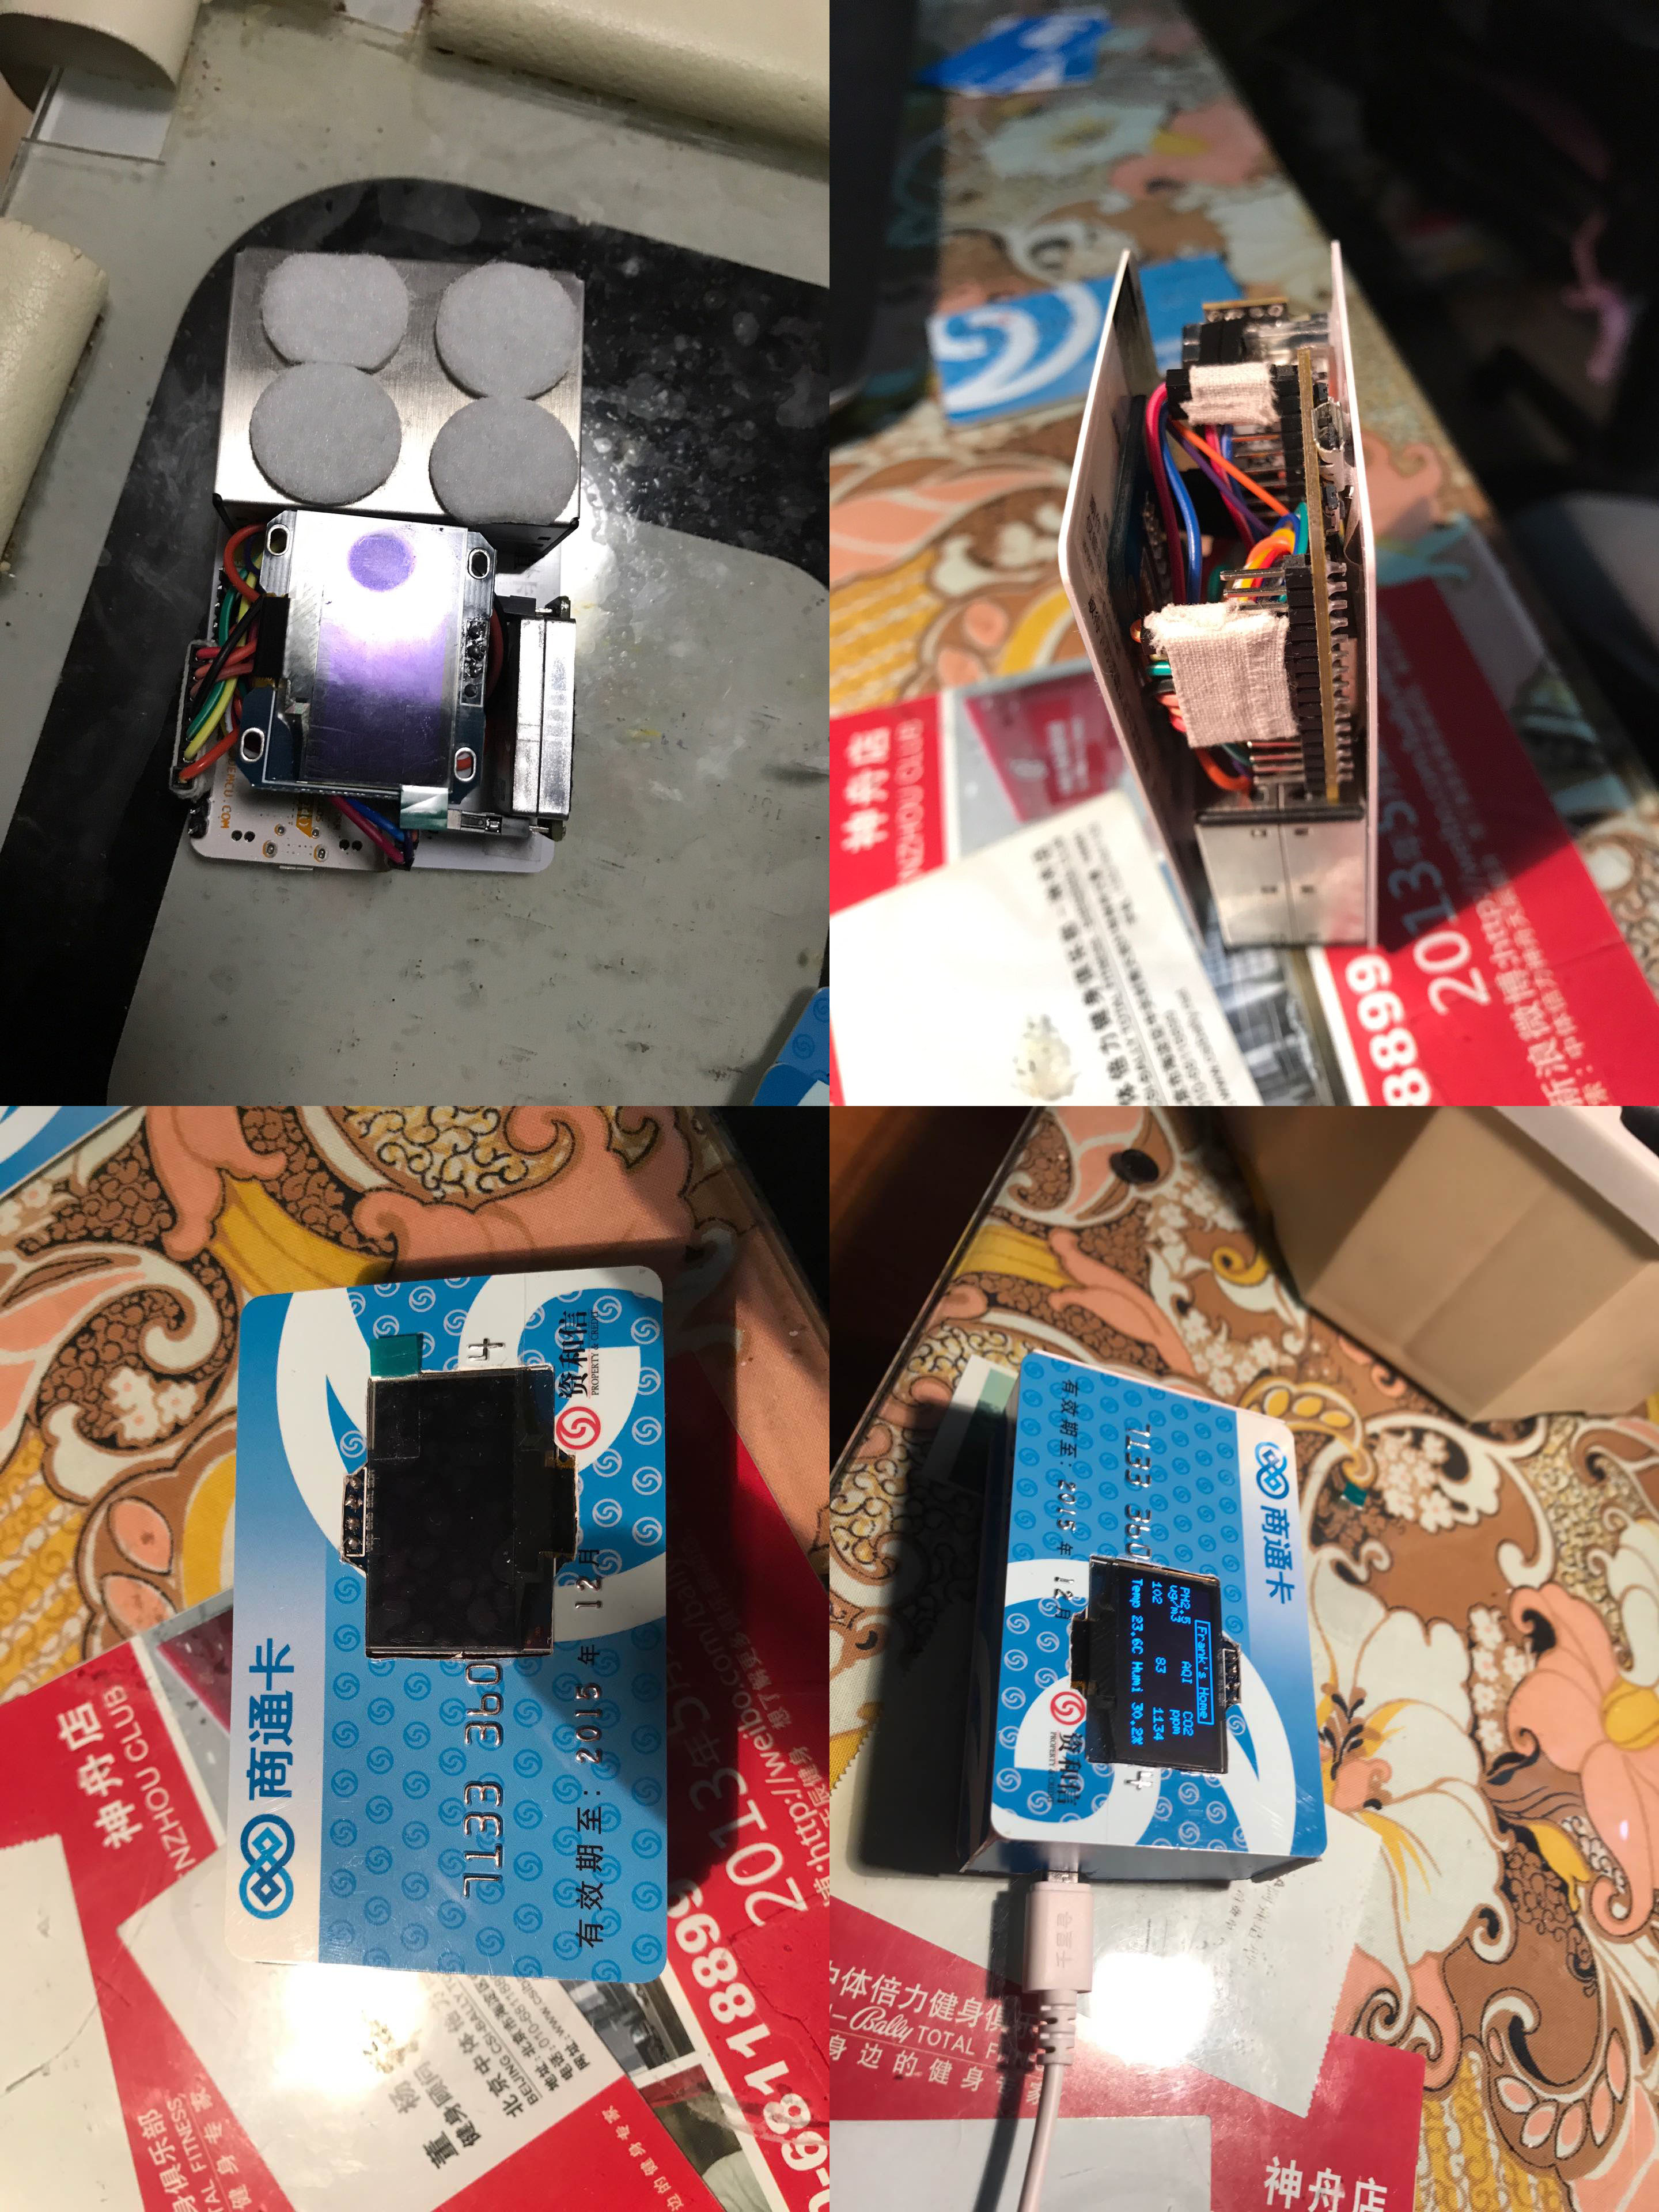
3.传感器的接线与外壳DIY
上传完后,接下来就是各种传感器和设备的连接,具体的连接方式可以间下图所示,由于网上有相关的资料我就直接引用了(自己DIY的灵感也是取自这位大神,自己在代码上面做了优化和修改),出处为:http://post.smzdm.com/p/539326/。
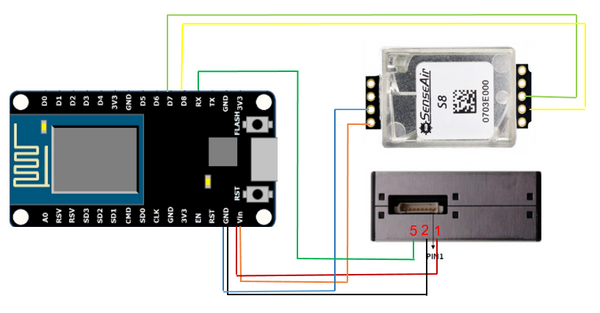
具体实物连接见下图:

在后面就是DIY外壳了,外壳使用废旧的卡片!
4. HomeAssistant中的配置
最后在说说HASS中的配置,由于使用的MQTT服务的发布和订阅功能,如果需要实时显示监测数据就需要对HASS进行配置,订阅的主题和esp8266发布的主题一致。本人使用的主题是:
/aqi1代表AQI空气指数
/pm25代表PM2.5
/pm10代表PM10
/pm01代表PM1
/temp代表温度
/hum代表湿度
/co2代表二氧化碳
/HCHO代表甲醛
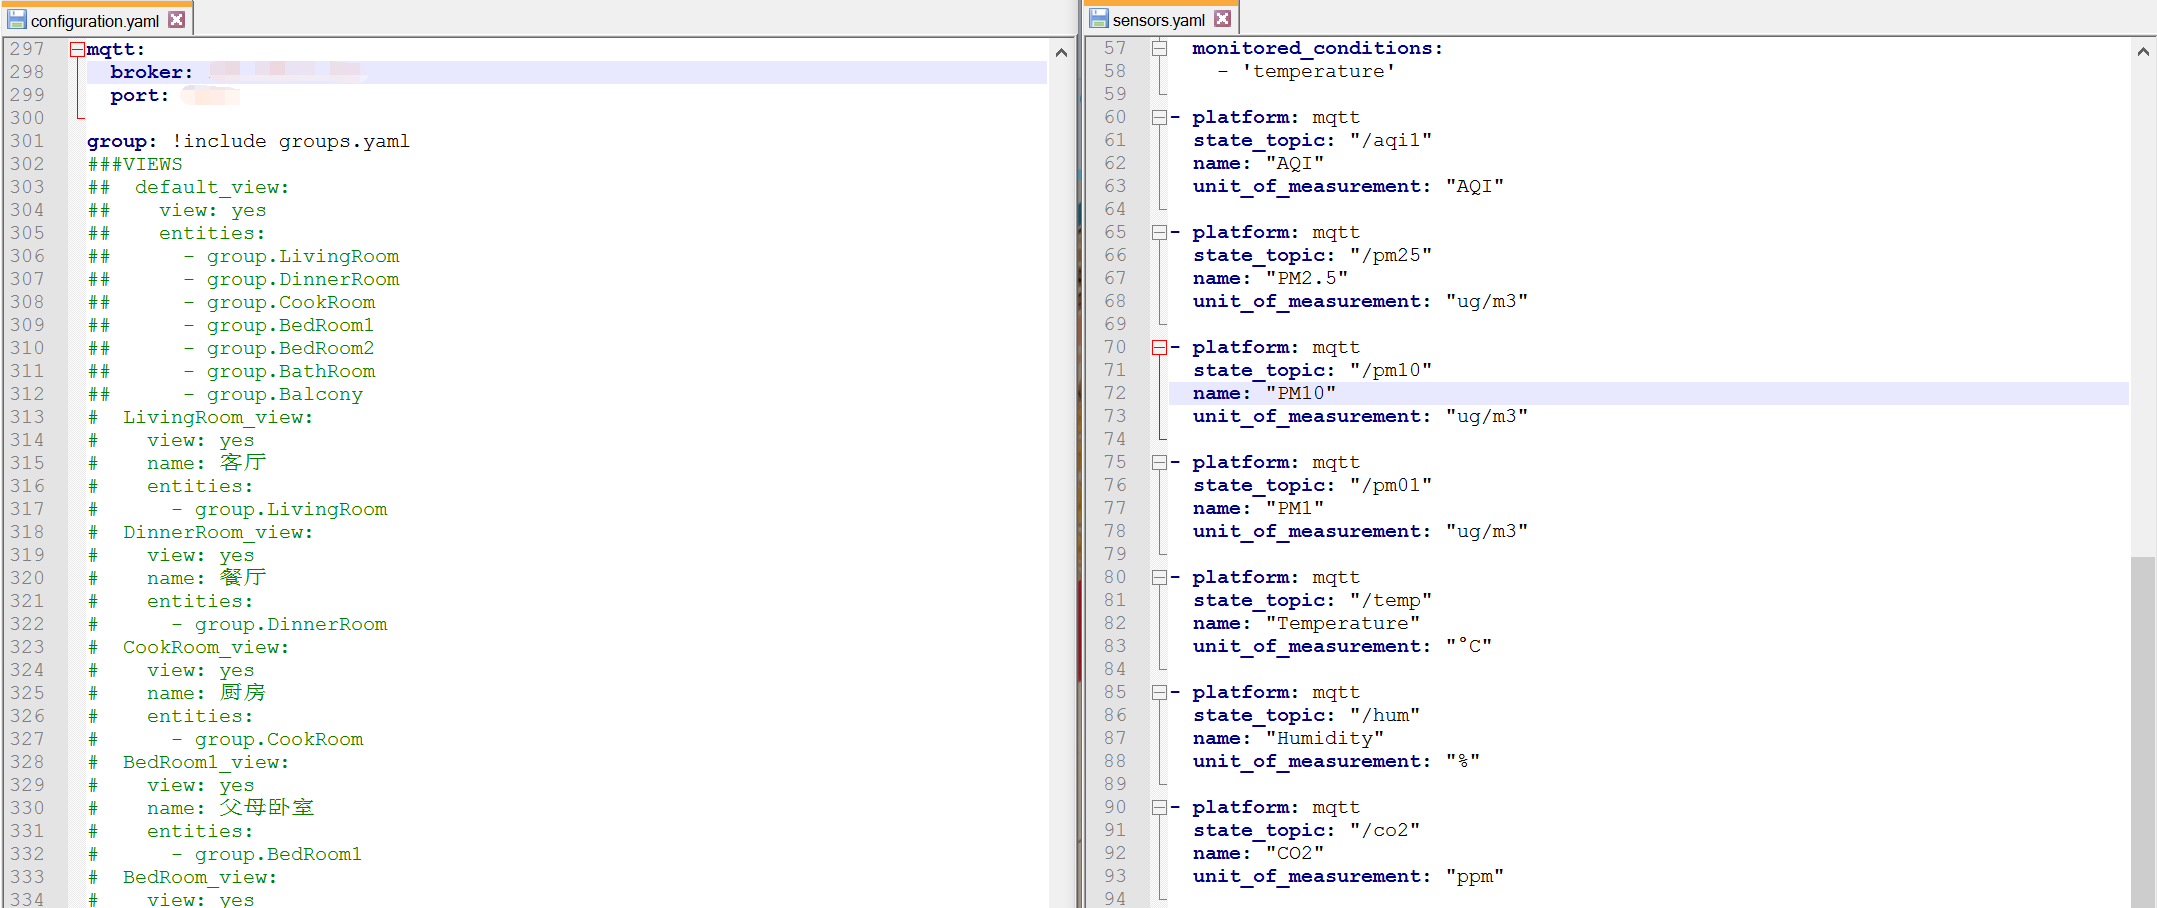
首先需要测试下MQTT通道是否能用,将以下代码放入configuration.yaml里面
mqtt:
broker: MQTT 地址
port: MQTT端口
过后在将如下代码放入配置子文件中,如果不想放在子文件中,可以直接写入configuration.yaml中,需要去除platform前面的“-”。
– platform: mqtt
state_topic: “/aqi1”
name: “AQI”
unit_of_measurement: “AQI”– platform: mqtt
state_topic: “/pm25”
name: “PM2.5”
unit_of_measurement: “ug/m3”– platform: mqtt
state_topic: “/pm10”
name: “PM10”
unit_of_measurement: “ug/m3”– platform: mqtt
state_topic: “/pm01”
name: “PM1”
unit_of_measurement: “ug/m3”– platform: mqtt
state_topic: “/temp”
name: “Temperature”
unit_of_measurement: “°C”– platform: mqtt
state_topic: “/hum”
name: “Humidity”
unit_of_measurement: “%”– platform: mqtt
state_topic: “/co2”
name: “CO2”
unit_of_measurement: “ppm”– platform: mqtt
state_topic: “/HCHO”
name: “HCHO”
unit_of_measurement: “mg/m3”
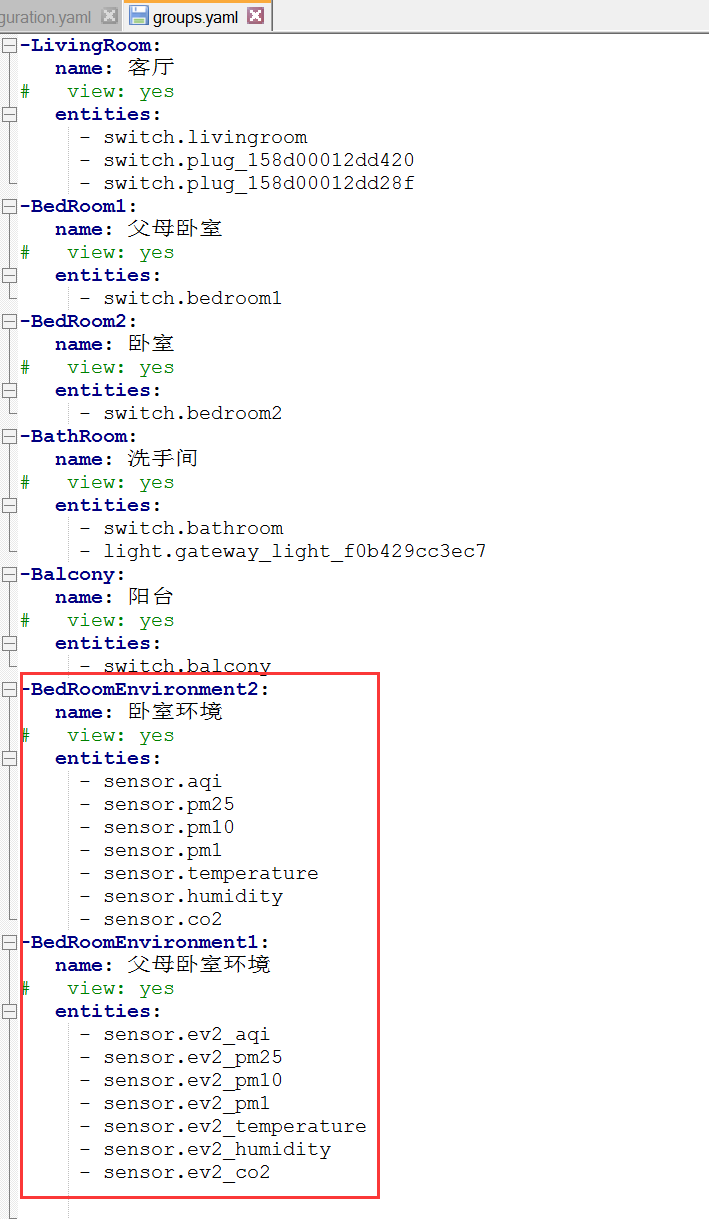
格式可参照如下:
在进行分组就可以将在顶端显示的图标移至栏中显示:
最后在HASS中的显示效果如下:
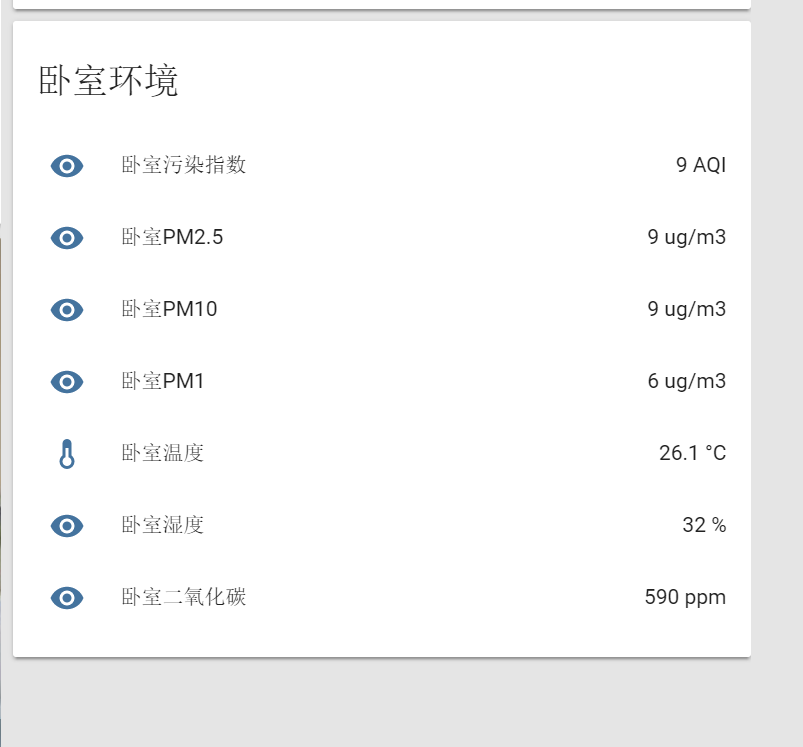
过后再将其和Homekit联动,配置方法在我的另一个博文中有涉及,所以就不在这边累述了,具体可见:打造属于自己的智能家居(home-assistant和homekit)。
最后附上:esp_init_data_default,这个也可以自行google下载也可以。
好了就写到这里吧!有问题可以站内PM我或者QQ联系我,希望能帮助大家打造自己的空气检测器。
| 移动设备快速阅读本文: |  |
| 请扫描右侧二维码 |
